


Site Preparation
- Clear away clutter! This allows for effective treatment and stops bugs from hiding. Place Items in Plastic Containers or Plastic Bags
- Fix loose wallpaper. If any.
- Seal cracks and crevices. Use caulk to block potential entry points around baseboards, outlets, etc., within 20 feet of where the bed bug signs were found. Here is a suggested silicone sealant to help you with that:

What to do with infested items?
If you have an infested item (book, piece of furniture, toy...etc.) where you found bed bug signs, you have three options to deal with it:
- Option 1: Treat. Vacuum and Steam the item (see steps below).
- Option 2: Trash. Put the item in a sealed bag and dispose of it outdoors right away.
- Option 3: Quarantine. Seal it in a bag and leave it untouched for an entire year to ensure all bugs are dead.
Suggested Bag:

Step 1: Wash Bedding

Image Credit: WikiHow
1. Gather bedding and any infested fabric items immediately and seal them in plastic bags. This prevents bugs from escaping.
2. Wash on the HOTTEST water cycle safe for the fabric. Use your regular detergent.
3. Dry on HIGH heat for at least 30 minutes. Heat is key to killing all stages of bed bugs.
4. Store clean items in new, sealed bags until the infestation is resolved.
Note
Laundering in cold water, even with soap, will not kill bed bugs. High temperature is the key here. Consistent temperatures above 120°F (49°C) will kill bed bugs at all stages of their lifecycle, including those pesky eggs.
What if I have non-washable fabrics?
If you have items that cannot be washed (or exposed to high temperatures), you may want to consider the following alternatives:
- Sealing them in bags for an entire year.
- Freezing in a sealed plastic bag at below -17°C (< 1°F) for at least 4 days.

Image Credit: WikiHow
Step 2: Vacuuming
Vacuuming removes bed bugs, especially from hard-to-reach spots like under baseboards.
1. Insert a nylon sleeve into the vacuum hose. To keep bugs out and avoid them infesting the vacuum, cover the end of the vacuum tube with a nylon sleeve (knee-high stocking) before attaching the nozzle.

2. Vacuum slowly and carefully. Focus on potentially infested areas:
- Where you've seen bed bugs, their stains, or shed skins.
- Mattresses seams
- Spring boxes
- Furniture, especially the wood joints
- behind the headboard
- along the baseboard
- At any cracks or electric plugs
- Floor and carpet
3. Dispose of the nylon sleeve: Seal it in a plastic bag and put it in your outside garbage bin.
4. Empty the Vacuum: Seal the vacuum bag in a plastic garbage bag and dispose of it in an outdoor bin. For bagless vacuums, empty the canister into a sealed plastic bag for disposal, and clean the canister with hot, soapy water.
Step 3: Steaming
Steaming kills bed bugs and eggs on contact. But, use it alongside other methods for complete elimination.

1. Get a steamer: There are plenty of affordable steamers out there in the market. Here is one we suggest:

2. Pick a nozzle: Use a triangular attachment for broad surfaces and a detail nozzle for narrow cracks and crevices.
3. Slow and steady wins the race: Use the steamer on suspected areas (mattresses, box springs, furniture, baseboards, cracks).
- Move it at about 1 inch per second for the best results.
- Keep the steam tip 1~1.5 inches away from the surface: Too far reduces killing power; too close risks spreading bugs or creating excess moisture.
4. Manage moisture: Avoid saturating surfaces to prevent mould issues. You may need a microfiber cloth to wipe up excess steam.
Step 4: Place Encasement
Starve them out! Encasements trap any surviving bed bugs and eggs inside your mattress and box spring, ensuring they starve and die.

1. Buy quality encasements: Look for:
- Durable fabric to prevent rips and tears
- High-quality zippers that seal completely
- Designed to last at least a year for full protection

2. Encase BOTH mattress AND box spring (if possible)!
3. Let it sit for a year. Keep the encasements sealed for at least one year to confirm the eradication of all bed bugs. Refrain from opening them during this period.
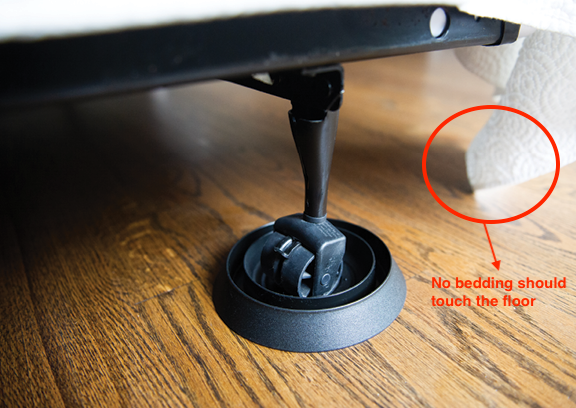
Step 5: Interceptors
Your secret weapon against bed bugs! Interceptors trap bugs as they try to access your bed or furniture, helping control the infestation and showing you where they're active.
1. Buy interceptors if you did not do so during the Identify stage.
For normal size bed legs (less than 4” diameter), we recommend the following interceptor (Black Colour only):

For wide bed legs (Less than 5”x7”), we recommend the XL interceptor:

2. Prep Your Bed: Move it away from walls and furniture. Bed skirts or extra bedding should not touch the floor.
3. Install Interceptors: Place one under each bed leg.
Step 6: DE Dust
Diatomaceous earth (DE) is a naturally occurring substance often touted as a non-toxic way to kill bed bugs.
 for bed bugs")

How to apply DE dust?
Round 1 Application:
1. Focus on Infested Room: Start with the room where you've confirmed bed bug activity.
2. Apply a THIN layer of DE. A thick layer would have negative results.
3. Target Areas:
- Cracks and Crevices: Use the paintbrush to apply a thin layer of DE inside cracks, crevices, and voids along baseboards, in furniture, and other potential hiding spots.
- Furniture Legs: Lightly dust around the base of bed legs and other furniture legs where bed bugs might climb.
- Baseboards: Apply a light dusting along the entire length of the baseboards.


Image Credit: WikiHow
4. Leave for 10 Days: Allow the DE to work undisturbed for 10 days.
5. Careful Cleanup: After 10 days, wear your protective gear and thoroughly vacuum up the DE. Use the nylon sleeve in the vacuum pipe as instructed earlier. You may also gently wipe down surfaces with a slightly damp cloth.
Application - Round 21. Wait for Three Weeks: After cleaning up the first round, wait three weeks before reapplication. This timing helps target newly hatched bed bugs.
2. Infested and Adjacent Rooms: Treat both the originally infested room and any adjacent rooms. Bed bugs might have spread there.
3. Repeat Application Steps: Follow the same application process as in Round 1.
4. Leave for 10 Days, Then Clean: Again, leave the DE for 10 days before carefully vacuuming and cleaning.
Post-treatment Monitoring
Despite your efforts to treat the infestation, the job may not be finished immediately. Stay alert – post-treatment monitoring can catch any survivors early and give you peace of mind. Interceptors will be your key monitoring tool.
Why Interceptors are vital?
- Early Detection: They can spot even a few bed bugs trying to reach your bed.
- Targeted Action: Finding trapped bugs tells you where to focus inspections and any necessary treatments.
- Reassurance: Empty interceptors confirm treatment success over time.
How to Monitor with Interceptors?
- Keep them in place! Leave your interceptors under bed legs (and legs of other treated furniture).
- Monitor adjacent rooms: Place 1-2 interceptors in each room adjacent to the original infestation site. You can either place them under furniture legs, or use the toilet paper tube trick to place them randomly in the room.
- Check weekly for 6 weeks. Carefully remove any trapped bed bugs. Note where the bugs were caught.
- Watch for LIVE bugs: A few dead bed bugs after treatment can be expected. Finding live bugs means you need to take further action.
How long should I leave the interceptors in place?
Keep interceptors in place for 6 weeks after treatment.
What if I find live bed bugs in the interceptors?
If you find more than one live bug (in either the original or newly monitored rooms), repeat the treatment process in those areas.
What if I don't find any live bed bugs during monitoring?
If no live bugs or their signs are found for 6 weeks, you can announce "the bed bugs are gone!" Well done!
Still, it's wise to check for bed bugs every 3 months for a year as reinfestations can happen post-treatment, even with professional pest control. Click here to learn more about how to do the check.
